The goal in the elaboration of this guide is to explain all the settings available in the DBR9 from Black Arrow, and its influence, individually and as a set, to the improvement of its performances, setting it up to the needs of each and every pilot or circuit.
In the same way, this guide is only a reference to clients of Black Arrow not being a strict set of rules, but a solid base to work over the model. There are so many ways to set it up as there are pilots or preparers. There are other ways to reach the same levels of performance than the ones here explained.
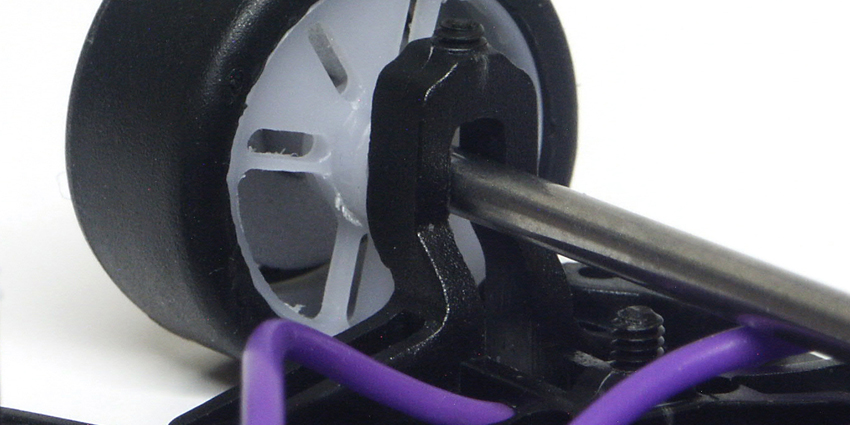
1.- Front Axle
We will start by explaining the modifications to the front axle.
As the main feature, we can tell you that the front axle should be free, meaning that it should allow the wheels to touch the track in curves, and should work as a support to the chassis. Bearing this in mind, we will focus on avoiding contact in straights, though having it in curves. This way we will avoid the car crashes due to continue or sudden support of the wheels.
The front axle has three points of modification to work on:
1.1 Upper regulation
1.2 Lower regulation
1.3 Width
1.1 Upper regulation
The two M2x3 screws destined to regulate the upper side allow you to constrain the upper clearance of the axle. This will manage the car performance entering curves or in continued or sudden supports.
The basic setup will be achieved by posing the car in a plain base and raising one of the rear wheels until the opposite screw of the front axle hits the axle. We should now measure the distance that the back wheel raised.
Basic upper setup: (distance between the rear wheel and the base) 1,5mm
Variation:
If the car still understeers: reduce the distance (tighten screws)
If the car loses traction (oversteers): increase the distance (loosen screws)
1.2 Lower regulation
The two M2x5 screws under the front axle are o shift the height of the axle, static.
We will position the axle as high as possible, nevertheless, keeping it with a vertical clearance to juggle of at least approximately 1mm.
1.3 Width
The front axle width influences the behavior of the model when it entries a curve.
Basic width setup: two spacers with 0,5mm each, on each side.
Variation:
More grip on the front: More front width
More rear grip: Less front width

2.- Rear axle
The rear axle has multiple variables, such as:
2.1 Suspension
2.1.1 Springs
2.1.2 Bump Stops
2.2 Width
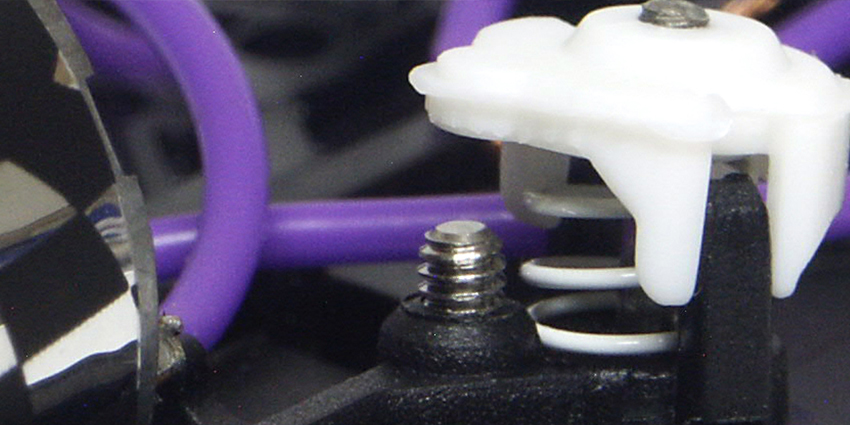
2.1 Suspension
Suspension is the most important setup, as far as performance is the matter. With the springs and its courses we can improve our DBR9 and set it up to the track’s grip conditions, as well as to different styles of driving.
2.1.1 Springs
Springs are in charge of transmitting the weight of the body and chassis to the rear wheels. How the weight shifts from sides and direction will be important for how the car behaves.
The measure to take is between the top of the cradle’s screw and the plastic nut.
Basic setup:
Front: 0,00mm
Rear: 1,00mm
As a general aproach we should take the following in mind:
Low grip: harder springs
Too much grip: softer springs
Springs are in charge of transmitting the weight of the body and chassis to the rear wheels. How the weight shifts from sides and direction will determine how the car behaves.
Usually you should use front springs that are as hard or even harder than the rear springs. The perfect combination will be dictated by the clock and the driver’s driving.
The spring’s hardness pre-loaded can be changed quickly by tightening the nut down (yes, you’ll need a lot of pre-load. We recommend harder springs). This change will lower the nut that works as a “roof” for the spring, you will need to work this out.
2.1.2 Bump stops
The motormount movement and the suspension springs are fundamental and complementary. Both work as a set in harmony. If one of them is incorrectly set, this will surely affect the performance. The movement can be set up by tightening or untightening the M2x6 screws in the motormount.
Basic set up measuring distance between the M2x6 screw and the plastic nut (bump stop):
Front: 1,50mm
Rear: 1,50mm
Variation:
Harder Springs: bigger clearence
Softer springs: shorter clearence
Usually the front clearances will be longer than the rear ones. This is due to avoid that the chassis when flex doesn’t touch the track, and the rear tires touch the body. We should always avoid those contacts.
We can try different set ups for the motormount depending on the grip and style of the driver.
2.2 Width
The rear axle should have as much width as possible. Its outer limit will be the point where the rear tyres touch the body when the suspension is compressed. This will cause a braking effect when curving.
Basic Set up:
Rear axle width (with tires assembled): 63,4mm
3.- Body height
The body’s height is a basic, but very important modification. The rule to be followed consists in having the body the lowest possible without touching too much on the track. This can be achieved working with the four M2x3 screws provided beside the body screws. It’s important that the car stays symmetric in the front view, so be sure to set this up with a plane base.
In a general way the rear will always be higher than the front, making the body work as a wedge on the track. This way we avoid that the body touches the track when the suspension is compressed under cornering.
The measure will be about the spacing between the head of the screws to the chassis.
Basic Set up:
Front screws: 1,00mm
Rear screws: 1,50m

